Setup Procedures for Google Analytics
There are hundreds of amazing reports available from Google Analytics, and most come “already made” when you add the GA tracking code to your website. I want to discuss three specific GA reports that you have to do a little legwork of your own to setup, but which can reveal incredible insight into your website traffic data. The three reports I want to show you how to set up are for Goals, Advanced Segments and Experiments.
Say for instance that you want to measure blog posts on your site where the visitor came from a social media site and landed on a blog post and where that visitor subsequently completed a contact form. This information would tell you which social media campaigns and posts were the best at converting visits to leads.
In order to explain this, I first need to explain setting up a goal in Google Analytics to track when a visitor gets through to the contact us form completion page, then I need to explain setting up Advanced Segments to make sure the visitor came from a social media site and landed on the blog, and finally I’ll explain how to set up an experiment to determine whether a Contact Us button on the blog post works better than a text link, or vise versa.
Setting up Goals in Google Analytics
You set up goals to track discrete actions – such as a thank you page on a signup form, ecommerce transaction, or the amount of time spent on a site. You can set up to 20 goals per profile.
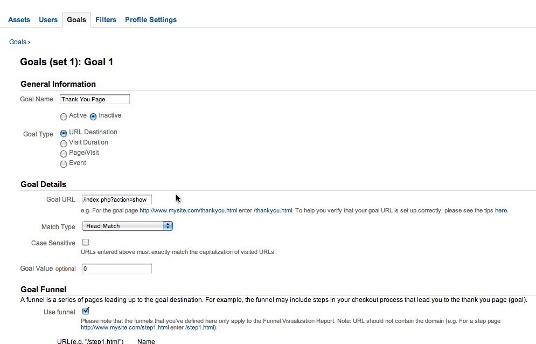
In admin, select the profile you want to use for the goal. Give the goal a name. Here I’m setting up a goal called “Contact Us”
You can set up 4 types of goals:
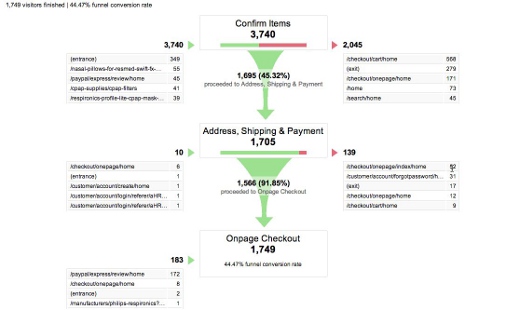
- Destination: Just as I’ve set up this “Thank You Page” goal, you can designate any URL on a website or a screen on an App as a destination goal, and you can give it a goal funnel. (You might want a funnel to see where visitors are leaving the conversion process, especially in an shopping cart. You just add in each step of the funnel and make the first step required.)
- Visit Duration – this type of goal can be set up to see how long visitors stay on a site.
- Pages/Visit or Screen/Visit – you can set a condition for this goal – such as after a certain number of pages are visited.
- Event (you have to first set up event tracking) with this goal you can track a combination of event conditions (including event category, action, label or value.)
After you set up your goals, save them and then look for them in the goal report (under conversions for websites or outcomes for apps.)
Setting up Advanced Segments
Advanced Segments let you analyze specific kinds of traffic. For example, you might create a segment that only includes visits from the social media sites you are running a campaign on. After you apply the segment, you can look at all your Analytics reports, limiting (or filtering) visits just from your social media campaigns, and you can compare this data next to data from all visits.
You can create your own segments and apply them to your data as well as select from predefined segments. The predefined segments are available by clicking the Advanced Segment tab in all standard reports.
After you choose the segment, just apply it and will show in all reports in that profile until you select the “all traffic” segment again. Google has a page full of pre-made advanced segments available here. You can simply click on the link on this page, and that advanced segment will be copied to your analytics account.
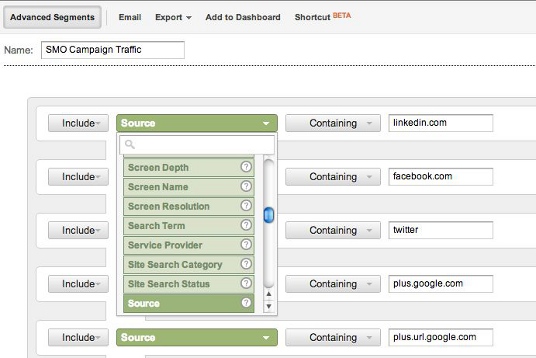
Let’s say we want to create an advanced segment to show only the social media we are using in a campaign. We can create our own advanced segment. In this case, we want to go to the Landing Page report in the content section of Analytics because we want to see which blog posts visitors from our social media campaigns land on. Here we will click on Advanced Segments to filter out only the visitors who came from our specific social media campaigns. We will call our segment “SMO Campaign Visits”.
There are a series of include statements that make up each advanced segment. You can choose OR / AND statements to connect them. In this case we want to include traffic that comes from LinkedIn, OR Facebook OR Twitter, Or Google+ OR Youtube for our social media campaigns. Once we save this segment, we can choose to apply it across any of the profiles in our analytics account by choosing the “more options” link.
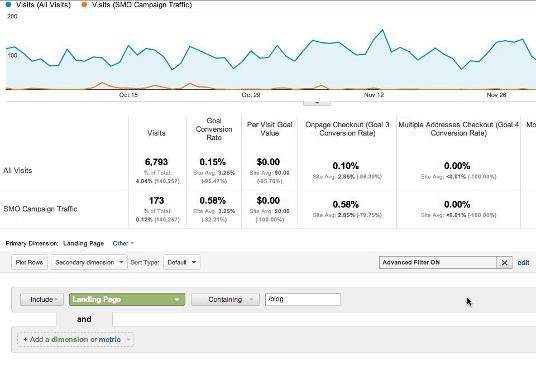
After the Advanced Segment is setup and applied, we can further filter traffic by selecting the Advanced filter on the Landing page report and choosing only traffic that lands on blog pages. This report also has an option that shows goals. So here we can see all traffic that came from social media campaigns, landed on a blog and converted to a lead or sale.
The results showed that while the landing pages from all visits had a conversion rate of 2.95, the landing pages from the social media campaigns to blog posts had a conversion rate of .58%.
Setting up Google Experiments
So why are our blog pages not converting as well as they might? We can use Google Experiments to check small changes on the blog pages that can make big differences in conversion rates. Maybe we need to add a plugin to take people to related posts? Maybe we need to add a “Contact Us” button? We can set up experiments for these situations using Google’s Content experiment tool to make informed decisions before making site-wide changes.
The first step, after you decide what changes you would like to try, is to make two copies of your Wordpress post without getting hit with duplicate content penalties by the search engines. On this blog post we want to add text and a button at the bottom of the post, and test it so see if it results in better conversions than the original post: This will become version 2 in the experiment.
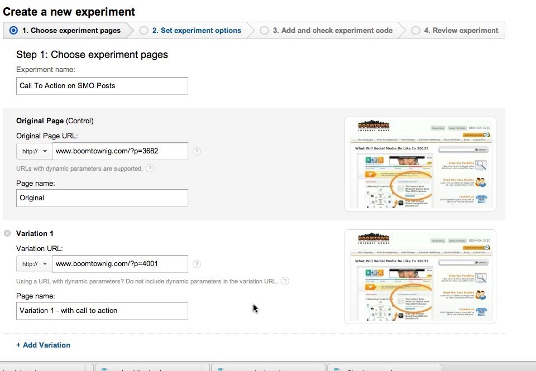
So first you need to duplicate the post, and you make sure that the permalink URL of both posts are different (we recommend calling them –EXP-option-2 or some other pneumonic that adds meaning. This is the first step in the Analytics experiment:
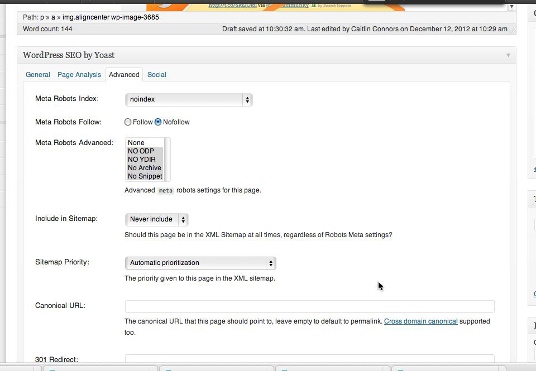
Then you have to make sure that the new page is “no index” in the meta information. Here is a screen shot of the SEO parameters you need to set in the Yoast plugin:
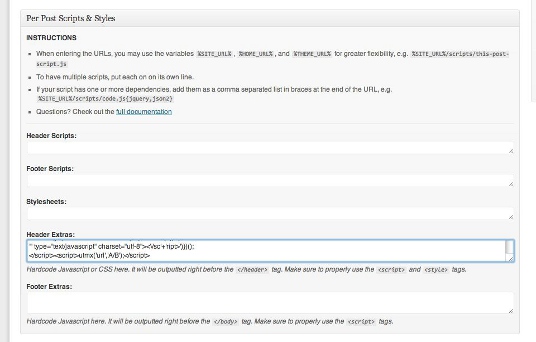
Next go to the experiments steps again and set up the goal you want to test (in our case we made it filling out a contact us form) and in step 3, generate the code snippet that needs to be added to each page in the experiment. If you have installed the Phillip Walton Wordpress plugin, this is where to put the experiment code on each page:
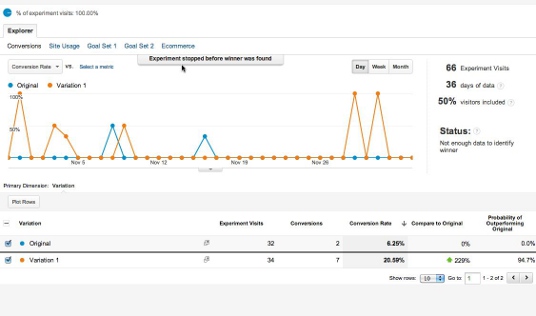
After you validate the post, your experiment will begin. Here is a sample of a similar experiment that we have been running for a month or so. This experiment shows that a text link worked FAR better in terms of conversions than a graphic at the head of the page.
You can see that the conversion rate is almost 200% higher with the text link.
By setting up goals, employing advanced segments to filter traffic, and making use of experiments, you will be able to quickly answer complex marketing questions for your site, using absolute data.
If you have questions about anything in this post, please don’t hesitate to give us a call or email us. We have 6 team members currently certified and well versed in Google Analytics that can help you answer your questions. In addition, we plan to hold another webinar on this topic and will embed the video into this post as later in the week. We hope you stop by and visit us to watch that.


